Think Like a Trout, Act Like a Bug.

Tuesday, December 31, 2013

Looking Back

It’s funny – several weeks ago, while interviewing a local fly rod builder for a film I am working on, I asked him about the first fish he ever caught on a fly rod; he couldn't remember it. At the time I found that a little surprising. But upon later reflection I realized that although I could still remember my first fish (a 12 inch yellow perch caught on a worm), I could not for the life of me remember my first fish on a fly rod either. Perhaps the question was not an entirely fair one to ask. It seems the older we get, the more experiences we accumulate, the less inclined we are to recall events that have become diluted by the multitude of more recent and vivid memories. Looking back over a lifetime can be a daunting task.

Looking back over the past year is a little more manageable. And New Year’s Eve seems to be as good a time as any to reflect on the most memorable events, the most memorable trout, of the past fishing season.

I did catch my share of big fish this year - and had a few days where the fish were more than cooperative. But this year the nod goes to a 12 inch rainbow. Yup – a single 12 inch fish trumped all other fish – hands down.


This was a wild fish caught in a wild place that took more than a little effort to reach. It was the only fish I caught that day. Given the harsh habitat, this fish was likely as old as your average 24 inch rainbow on the Bow River. But if you can imagine taking all of the color, all of the vibrancy, and all of the spunk of that 24 inch Bow River fish, and concentrating it into 12 inches of sleek, feisty, chrome-bright skin and scales…


Sometimes it’s the big one, that 26 inch plus bruiser, that stirs fond memories; sometimes it’s the big one that got away; sometimes it’s the day where you caught fish after fish until you started taking things for granted, and thought you had it all figured out – and sometimes… sometimes it’s about going after the hard ones.
Monday, December 23, 2013

Bonefish Bound

For the fly tier, winter is the time to bolster ones dwindling fly collection, to re-stock near empty fly boxes from the past summer, and perhaps create a few new patterns to test out next summer. For the fly angler that ties their own flies, there is no off season

For me November was rather busy and it has only been in the past few weeks that I have had time to start tying again. There always seems to be a shortage of time around the holidays so it helps to set priorities – I like to start with the fly boxes that I anticipate using first in the coming year. In this case it will be another trip to the Bahamas in search of Bonefish, so the Bonefish box was the first one to get topped up.
I started by tying a few of the standard Bahamas patterns like Gotchas and crab flies.
Olive Gotcha - a standard pattern for Bahamas Bonefish

A simple Bahamas crab fly
After that I got creative and invented a few patterns of my own – a shrimp-like pattern in two colors along with a fan-worm pattern. Both patterns look like they might attract the attention of a bonefish. Not sure what to call them yet.


We’re heading back to Mayaguana in the New Year and I’m pretty excited about it. Mayaguana is a rather remote out island that sees few visitors each year. Endless beaches, endless bonefish flats and rarely a person in sight. There is better fishing to be had at other locations throughout the Bahamas but none are as remote and laid back as Mayaguana. There was a write-up in the most recent issue of Catch Magazine so I’m hoping the island doesn’t start to draw a crowd.

Endless Bonefish flats at Curtis Creek on Mayaguana
(that tiny spec in the distance is me)

Thursday, December 5, 2013

Best Fly Fishing Videos: Part Two

Another video that is at the top of my list is Tapam; a remote location, 100 pound plus Tarpon, a fly rod, and a float tube. The film is nothing short of jaw dropping. This full length film was produced by Daniel Goz and Jan Bach Kristensen. You can watch the movie trailer at the Tapam the Movie website. The full length film is available on Blue-ray or DVD.

A custom cut (short) version appears in the January 2011 issue of Catch Magazine. You will need to sign up for a subscription ($12/year) if you want full access. This online magazine is well worth the nominal fee.

Watch the trailer, watch the custom cut, but if you want to get the full experience, the full length DVD is the way to go.


Monday, December 2, 2013

Best Fly Fishing Videos - Part One

Anyone who subscribes to Catch Magazine is likely familiar with the outstanding fly fishing videos produced by Todd Moen. I consider Todd to be the master of his craft and I look forward to the newest version of Catch Magazine just to check out Todd's newest film in each issue (especially through the cold winter months). One of his best short films, Fall Run, is available for viewing on his website:

http://www.toddmoencreative.com/


Winter Run is also a good video - but if you click on the right hand arrow it will scroll you over to Fall Run. Make sure you watch it in HD (even if you have slow internet speed and have to go do something else while the film loads) and turn up the volume - the soundtrack adds to the experience.

Monday, October 28, 2013

Wood Fly Rod Build: Back to Square One

Well...I pulled the wood fly rod blank from the Varathane several weeks ago and put it back into the drying jig to give it plenty of time to cure before winter. But as I was inspecting my handy-work over the weekend I noticed a very fine split half way up the blank.

This has never happened before.

I suspect that the split was there all along (likely from the initial drying process) but was not noticeable until the wood was stained (much like when the wood grain comes out more when it is varnished). I have decided that I do not want to risk putting $100 in components on the blank only to have it break at the split. This blank will be scrapped and I will search for a new one over the winter. A little disappointing - but that's all part of the charm of building wood fly rods.

This of course means that it will be over a year before I resume this project (it will take that long to fully dry another blank). For those of you wanting to build your own, this would be a good time to search out and dry your own rod blank - once I resume work, you can follow along with your own.

In the mean time I can still fish with my other two functional wood fly rods.

Thursday, October 17, 2013

Waterboatmen and Backswimmer Pattern

I have had a few e-mails this past week asking me about my favorite patterns for Backswimmers and Waterboatmen. So here is my take on these two groups:

Backswimmers are in the family Notonectidae and Waterboatmen are in the family Corixidae. Both of these families are in the same insect order (Hemiptera = True Bugs) and can generally be imitated with different sizes of the same pattern. There are many other families in the True Bugs group but most are terrestrial, and the few that are semi-aquatic are seldom important to fish. Backswimmers and Waterboatmen however are in a class all of their own; and form a large part of a trout’s diet in the spring and fall when the adults are most active and most abundant.

Backswimmers and Waterboatmen have a one year life cycle and go through incomplete metamorphosis. Overwintering adults lay eggs in the spring and die shortly afterwards. The eggs hatch and juveniles that look like miniature versions of the adults, but without wings, spend the summer feeding and growing through five instars. The fifth and final moult produces a fully winged adult that for the most part continues its underwater existence. The forewings are generally dark and leathery and lay overtop of the flight wings which are thin and transparent. Large oar-like hind legs allow them to swim effectively under water.

The ability to fly allows the adults to move from one water body to another. This allows the adults to move to other locations should their wetland dry up, or to simply look for other water bodies to colonize. On warmer, calm days in the spring and fall you will often see the adults dropping onto the surface where it may take them a second or two to penetrate the surface film and dive to cover. This is when they are at their most vulnerable. They are also vulnerable when they dash to the surface to replenish their air bubble that allows them to breathe under water.

As to fly patterns there is really no need to get overly complicated; the basic parameters of size, shape, and color are really all you need.

Many patterns call for a 1XL hook, but I prefer a wider gap in relation to the hook size so I usually fish a standard wet fly hook in size 14 or 16. Backswimmers tend to be bigger than Waterboatmen so if you specifically want to imitate them you could go to a size 10 or 12. But Waterboatmen generally outnumber Backswimmers 50:1 – which is why I usually fish the smaller sizes.

Stout bodies of chenille or dubbing with a darker over wing of turkey quill, and some rubber hackle legs are standard and will give you the silhouette you need. A small bit of silver tinsel is often tied in near the rear end to simulate the air bubble that they use as an underwater lung. If you want your pattern to stay in the surface film, an over wing of black foam is the way to go.

The theory behind color is that you want to match the color of the surrounding habitat. And it is a sound theory – but rather than waste time tying various colors to suite different condition I tie all of mine with silver Mylar tinsel chenille which tends to reflect the color of the surroundings. It also ads a little sparkle to simulate the air bubble that they typically carry. Quick and easy to tie – and they catch fish.

Waterboatman pattern - this one is tied with the foam back

                    Hook: standard wet fly, #14 or 16
                    Thread: 6/0 black or brown
                    Body: silver Mylar tinsel chenille, medium (2 wraps only)
                    Wings: mottled brown turkey quill, or black foam
                    Legs: rubber hackle, brown or black


For a few tips on how to fish it, see my earlier post: Top Pick for Fall Trout.

Wednesday, October 2, 2013

Top Pick for Fall Trout

Local trout lakes are fishing about as good as they get all season – if you were thinking about heading out to your favorite lake, now is the time (today’s crappy weather aside).


The big hatches of summer have certainly slowed down but there are still enough bugs active to keep things interesting. The fish do tend to be a little less selective at this time of year and sometimes it seems that any pattern will attract at least some attention (especially from the tiddlers). But there are still certain patterns that tend to hook the most, and biggest fish.
Backswimmers and Waterboatmen are at the top of my list. Populations are at their greatest numbers in the fall, and characteristics of their behavior expose them to feeding trout more than at any other time of year. Regardless of what’s hatching, trout maintain a well-developed search image for these bugs and will rarely pass up the opportunity to pounce when they encounter one out in the open.
Waterboatman (Corixidae) - adult with fully formed wings
My preference is to stalk rising fish from a float tube – I usually work the edges of weedy shoals in 2-6 feet of water (this requires a slow and deliberate approach). Cast your fly on a floating line within a foot or so of the rise, twitch it a few times and then let it sit. If you don’t get a hit within a few seconds, start your retrieve – a series of quick 1” pulls with a long pause. Hits can come during the retrieve, or the pause; watch your fly line carefully on the pause – if it moves, set the hook.


A calm evening at a local trout lake - perfect conditions for spotting rising fish

Thursday, September 12, 2013

Mountains on the Menu

Mountain lakes have been fishing well these past few weeks.


Chironomid (midge) hatches proved to figure prominently at most lakes. This time of year small flies and fine tippets are the way to go - midge pupae in size #18-20 fished just sub-surface on a floating line will usually get results. Watch for cruising fish and cast well ahead of them. If there is no activity on top, try adding one or more small split shot to work deeper in the water column.

Chironomids swarming over a mountain lake
Aside from Chironomids, hatches are usually sparse this late in the season; making this prime time for terrestrials. If conditions are right trout can often be seen cruising the shoreline in search of terrestrial insects that have been blown onto the water. Meadow settings may see the odd hopper on the water but on most lakes tiny flying ants and beetles (#18), and yellow & black hover fly imitations (#14-16) are my top picks.

A nice Brook Trout cruising for terrestrial bugs


Tuesday, August 20, 2013

Resolute Lake - Strike Two!

Last summer you may recall that I did an overnight back packing trip into a remote mountain lake. It was a great trip, and I did see the odd small fish rising, but in the end I came out without having even hooked a fish. Part of the problem was accessing the shoreline to find places to cast – the banks were either too steep or there was trees/shrubbery growing right down to the water’s edge. The best I could manage was roll casting from a few locations, and the fish seemed to always be just out of reach. I decided that the lake could be more effectively covered if I had waders; this would allow me to wade out on the shallow shelf that extends around most of the lake, and get closer to the dark blue depths of the drop-off. A return trip was definitely in order.


So this past weekend saw me making my way back into this tiny enigmatic lake. Being short on time I decided that it would be fun to mountain bike to the lake and come back out that same day. And with waders in my pack I was confident that I would finally get a close-up look at some of the fishy inhabitants of the lake.
It was a great ride in. The Glacier Trail is by no means a difficult mountain bike route; mostly double track, the hills are gradual, and the base is relatively smooth. There are a few chilly stream crossings along the way but they are certainly far from being any serious impediment. The only difficult part is the final one kilometer bushwhack from the Glacier Trail down into the lake – if you stray from the faint remnants of a path you’ll hit some serious deadfall. The scenery at the lake (and in the Kootenay Plains) is spectacular – jagged mountain peaks, glaciers, and mats of pine forest surround the lake. The sense of solitude is what drew me back to this spot; that and the adventure of just getting there.
A rest stop at one of the stream crossings
As to the fishing – well, I think the post title says it all. I worked half of the lake perimeter with various nymphs on a sink tip line, both up on the shallow margin and down into the depths of the drop-off. Nothing; didn't even see any fish rising on this trip (granted the wind was constantly blowing making spotting risers and cruisers more difficult). It was one of those experiences that make you wonder if there really are any fish in the lake at all.
One of many rain squalls that rolled off the mountains
Will I ever go back to Resolute Lake? Absolutely – at least one more time. The adventure alone is worth the trip. But If I get skunked a third time, I think it may be time to move on.

Wednesday, August 14, 2013

Multiple Hatches, Trickle Hatches, and Keeping the Faith


This is the time of year when it all comes together in the trout realm. Water levels are more stable, water temperatures are in the zone, and the bugs are active. Trout are feeding whenever light levels allow; trying to pack on weight to sustain them through the lean winter months, and produce eggs for the fall or spring spawn.

This is also the time of year when you can expect multiple hatches of different bugs on any given day. Things can change in a hurry; what was hatching in the morning may be nowhere in sight that same afternoon. If the fish are selective, that fly that worked so well earlier in the day may get scant attention a few hours later. It is the adaptable and observant angler that makes the most of their time on the water.

This past weekend saw several species of mayflies hatching on foothills trout streams. The North Ram saw Green Drakes (Drunella), Pale Evening Duns (Heptagenia), and Western Light Cahills (Cinygma) hatching at some point throughout the day. Several Chloroperlidae stoneflies could also be seen fluttering about. All of these hatches are normally heavy at this time of year – drawing feeding fish to the surface with predictable regularity. Of course the recent floods have reduced the numbers of bugs present and the hatches seemed to be just trickling off. Few fish were seen rising with any semblance of consistency.

A Green Drake dun (Drunella doddsii) resting on stream side foliage shortly after emerging

But even this did not rule out the “match the hatch” approach to fly selection. You see, during heavy hatches trout will often form a search image of their target organism and key in on that one specific insect/life stage – ignoring all others (this is usually the most efficient way to feed during the maelstrom of heavy hatch conditions). Since the hatches this weekend were sparse, the trout were still forming search images of the insects hatching, and there were still some elements of selective feeding involved, but there was no advantage to keying in on any one specific hatch. All hatches were fair game and equally fed upon.

Under conditions like this the best way to trigger the trout to have a go at your fly is to simply show them something they recognize as food – something they are, or have recently been feeding on. On this weekend it was Green Drake emergers and parachute style Light Cahill duns that garnered the most attention. Nymphing in some of the deeper runs with a Green Drake nymph also proved to be quite deadly at times.

A North Ram River Cutthroat making a quick getaway

I am sure that searching type patterns and other random flies caught their fair share of fish this weekend. But if you prefer playing the odds, over random chuck and chance, match what’s hatching and have faith that your fly will out produce your favorite “go to” pattern.

Monday, July 29, 2013

Don't Discount the Small Stuff

In my intro to my Bugs page I used the analogy of a large bear tearing into a log to get at a few juicy bugs as an example of why larger trout, which are able to tackle larger food items, will also capitalize on hatches of tiny aquatic insects. The adage "big flies = big fish" sometimes holds true - but I prefer my catch phrase; small flies during a consistent hatch = big selective fish.

Not much gets in the way of a hungry bear looking for a high protein meal

Thursday, July 25, 2013

Getting Caught Up

These last few weeks have been a little hectic. Between weekly camping/fishing trips, work, and home-life there seems to be little time for much else – including blogging or fly tying: I actually had to buy some flies to get me through the next trip. I will try to get things caught up here and hopefully I can get back into the groove over the coming weeks.

Two weekends ago I spent some time west of Rocky – this was more of an exploratory trip to assess the damage and road conditions. Most rivers (including the North Ram) were in reasonable shape; some channels have shifted significantly, but what struck me the most was the number of bugs – or lack thereof. A quick look in the water and under a few rocks revealed what I already suspected. Most of the species one would expect to find were still there, just in much reduced numbers. The usual hatches were also there, and the fish were rising, but again the number of adults coming off the water were sparse. Luckily nature is resilient – insect populations will recover – but it will take a few years before populations approach “normal”.

A lone Megarcys signata Stonefly (adult male) drumming on a log
in hopes of attracting one of the few females flitting about
Smaller tributary streams fared much better – But since these refugia can play an important role in the recovery of both aquatic insect and fish populations it is important that they are not over-stressed.

Stream and river conditions are fluctuating daily; with spotty showers, what you see on any given day on one stream may not necessarily translate to the next. On our way home that Sunday evening a massive thunderstorm dumped enough rain and hail to spike flows overnight.

A mid-July hail storm just west of Rocky Mountain House - creating a winter-like scene

Last weekend found me hiking into a few new lakes out west for some Pike on the fly action. I mostly worked surface poppers over the drop-offs and around weed edges – lots of casting, and some beautiful surroundings, but admittedly the fish got the better of me.


Hiking across a fen to a promising looking pond

Casting poppers on an idyllic morning

Success!?
Some of the "Gators" were lurking in surprisingly shallow water

Wednesday, June 26, 2013

Local Trout Lake Update


It’s difficult to blog about fly fishing these days; it all seems so superficial given that so many in the province are facing such difficult times. The flooding this past week is the worst on record and the cleanup has only just begun. If you live near one of the affected areas and are able to help out, there is no shortage of people in need; and not just in the well-to-do neighborhoods – our First Nation communities and older neighborhoods have been hit just as hard and may in fact need our help even more (but they seem to get scant coverage in the media). If you live too far from the affected areas to pitch in, consider making a cash donation to a disaster relief organization.

If you do find time to do some fly fishing, lakes are the best option. With the cooler weather, local trout lakes are still fishing well and some big fish are being caught. Damsel and dragonfly hatches are almost done – although you may see a few stragglers emerging here and there.
Remnants of the spring Dragonfly hatch
Newly emerged Damselfly about ready to take flight.
Caddisflies are starting to come on strong. You can’t go wrong with a soft hackle emerger fished just under the surface, or rising to the surface on a floating line. Your best bet would be size 12-14 in a light brown/amber color. Adult cinnamon sedge imitations will also work well on cooler evenings and when egg laying females are skittering across the surface.

Caddisfly exuvia (shed pupal skin) indicating recent hatch activity
Adult Caddisflies resting on lakeside vegetation

Saturday, June 15, 2013

Part 6: Pseudo-lamination

The wood fly rod build project continues...

Lamination is a process where thin strips of material are glued together to form a multi layered composite that is stronger than an equal thickness of the original material alone. The increase in strength is usually the result of orienting fibers in different directions, and in part, from the adhesives used to bond the layers together (think about how plywood is much stronger and more resilient than a solid pine board).

Most modern wood fly rods (especially bamboo) are composed of multiple triangular strips laminated together. Laminated construction gives the rod more strength and power by off-setting weak areas in the wood grain (knots), or bamboo nodes; but the lamination adhesive and rod varnish also impart some additional reinforcement to the blank. Since my rudimentary fly rod design involves a simple piece of wood sanded to taper, the wood grain needs to be reinforced using alternate means. The pseudo-lamination process is designed to impregnate the entire rod blank with polyurethane. The polyurethane helps bind the wood fibers together and adds strength to any weak areas inherent in the wood.

To set up the pseudo-lamination assembly you will need two lengths of ¾" x 10' conduit, 10' of ⅝" ID clear vinyl tubing, a roll of electrical tape, and two clamps. Start by positioning the tubing so the end extends about 10 cm beyond the end of the two lengths of conduit; make a few wraps of electrical tape to hold it in position. Now working your way down the conduit, place a few wraps of tape every 20 cm so that the tubing is held straight all along the lengths of conduit. Leave the last 20 cm of tubing loose at the end to give room to fold the end of the tubing over and clamp it. With the assembly prepped, the rod blank is pushed all the way into the tubing.

The top end of the assembly with some of the tubing extending past the conduit.

The bottom end of the assembly with the tubing folded over and clamped.

There are two solvent based polyurethane products that will work best for the pseudo-lamination process: Minwax® Polyurethane, and Varathane®. My preference is for the semi-gloss finish of either brand – the gloss finish looks good but I feel that it produces too much reflection while casting (and may spook some fish), while the satin finish is too dull and produces a rod that lacks aesthetic appeal. Avoid any water based acrylic products as these will reverse all of the work done drying and heat treating the blank, and cause the wood fibers to swell.

In the past, I have always used clear polyurethane to bring out the natural look of the wood. But for this rod I am going to try using Minwax® PolyShades (stain and polyurethane combined) in a satin finish shade called Pecan (Varathane also produces a tinted product but it is not clear from the label if it is just regular stain, or if it contains polyurethane as well). The PolyShades Pecan finish should produce a slightly darker blank and hopefully enhance the wood grain. Once the pseudo-lamination process is complete, I will finish the blank off with a few coats of clear semi-gloss to get the final look I want.

The polyurethane should be thinned out using 10-15% mineral spirits to enhance penetration into the blank. A small funnel is used to slowly pour the polyurethane into the tubing. Fill the tubing almost to the top and clamp the upper end to prevent evaporation. Stand the assembly up in a corner of the garage (I put the end in a bucket in case something leaks). Check the polyurethane level daily and top up as required.  After a few weeks the level can be checked once a week. The rod blank should be allowed to soak for four months to allow for full penetration – another two months are needed to fully dry the blank once removed from the polyurethane. Note that summer is the best time to do this; unless you are fortunate enough to have a heated work space (cold temperatures will inhibit penetration of the polyurethane).

My rod blank has been soaking for a couple of weeks already so it should be ready to start drying by the end of September.


Wednesday, June 5, 2013

Don't Despair

With many central Alberta streams being off colour due to recent rains and mountain snow melt, now is a great time to get out to your favorite trout lake. The first week or so of June can provide some of the best angling of the year before the summer doldrums set in – late evenings or cloudy, drizzly days are my top pick.

Dragonfly and Damselfly hatches are peaking about now. These hatches often draw the attention of some of the largest fish in the lake, but patience and stealth are needed to entice them. Find a quiet area along the shoreline (i.e. a spot where there are no other anglers working the area) and slowly work a Marabou Dragon or Damsel nymph imitation over the weed tops on a floating line (or along the bottom on a sink tip if aquatic vegetation is sparse to absent). If the shoreline is undisturbed, large trout will often feed in just a few feet of water under low light conditions (i.e. late evenings or drizzly days).

Chironomid (midge) hatches will still draw their fair share of attention this time of year as well.

 
Chironomid larvae exhibiting some interesting colour patterns
 

Thursday, May 16, 2013

May Long Weekend Flashbacks

One hatch that you will likely encounter on most trout streams this May long weekend will be Blue Winged Olive mayflies (Baetis). This hatch really is a one stop smorgasbord that provides opportunities for trout to feed on all stages of the mayfly lifecycle. Baetis Nymphs are the prime target during pre-hatch migration and in the early stages of a hatch, and Emergers provide consistent surface action once the hatch gets rolling. But if these two life stages are considered to be the main meal, then it is the adult spinners that are served up as leftovers the day after.

Most fly anglers are familiar with a conventional spinner fall – once adult spinners have completed the task of laying eggs they fall to the surface with wings spread and float helplessly downstream.  Trout capitalize on this easy meal whenever possible, and the appropriate spinner pattern can be quite effective in the morning hours after a mayfly hatch. But some Blue Winged Olive mayflies (along with several species of caddisflies and damselflies) have a different egg laying strategy that exposes them to trout in an entirely different manner. I am talking about mayflies that crawl under water to lay eggs on the undersides of rocks and logs rather that fluttering over the water and dropping their cargo on the surface.

BWO adult spinner as it disappears below the surface
(once fully submerged the wings will slick back from their traditional upright position)
As the female spinners crawl under water their wings press back over the body and trap air that will sustain them through the egg laying process. The trapped air gives the adults a silvery sheen that is visible from quite a distance. Once egg laying is complete the spent adults are swept downstream, tumbling in the current. The slicked back wings still have air trapped on, or under them, and this is what many trout key in on when feeding on the submerged spinners.

The ubiquitous flashback pheasant tail nymph is a pattern that effectively imitates drowned BWO spinners. The wing case is tied with some sort of reflective material – usually silver tinsel, but Crystal Flash is also a popular choice. One school of thought is that the reflective wing-case represents air trapped under the cuticle of an ascending nymph. But that sheen can also look like the air trapped under the wings of a spent egg laying adult.

While the flashback pheasant tail nymph can be an effective choice when fished the morning after a Baetis hatch, a better choice is to tie a slim, mottled olive nymph-like pattern with the reflective material tied in as a trailing set of wings that reach beyond the tip of the abdomen. My preference is for two strips of silver Flashabou (at least on the smaller sized flies) tied in as a trailing wing.

This weekend is looking like a prime Baetis weekend; with the forecast calling for cooler temperatures and a little rain, hatch conditions will be optimal. Be prepared with #16-18 BWO nymphs for early hatch activity, emergers for the peak of the hatch, and some flashback “nymphs” to cover the spinner drift the following morning.

Tuesday, May 7, 2013

Stoneflies - Round Two


I was out poking around on a few central Alberta trout streams this past weekend. Conditions were reasonable on Saturday – a little murky on most streams but definitely fishable. Winter stonefly hatches are winding down on the lower elevation streams with just a few Zapada cinctipes hanging around.

Zapada cinctipes (adult female)

Caddisflies are coming off sporadically. I noted two species of Limnephilus; one was your typical cinnamon sedge in size 12, the other was a smaller gray species in size 14 (sorry no specimens or photos).

The most significant hatch that is just coming on line is the Skwala stonefly hatch (Skwala americana or Skwala curvata, or both depending on your location). This hatch is the first of the larger stoneflies to hatch in the spring and when it is just starting, it is often missed by the casual observer. Early in the hatch, and before the streamside shrubbery has developed any leaves, there are few places to hide. For this reason, Skwala stoneflies spend most of their time hiding under the streamside rocks. Many anglers assume that the hatch is just trickling off when in fact it is moving along quite nicely – it’s just that most of the action at this point is out of sight.

If you lift a few rocks along the margin (in the water or just out of the water) you will see both nymphs staging in the shallows waiting to emerge, and adults that have just emerged and are waiting for their wings to fully extend and harden.

Skwala americana (nymph on stream margin ready to emerge)

Skwala americana (newly emerged adult female
waiting for wings to extend)

The males are easy to pick out as they are generally the most active of the sexes early in the hatch (waiting to ambush females as they emerge). Males have reduced wings (about half the length of “normal” wings) while the females have fully developed wings. Both sexes can have bodies up to 20 mm long and the wings of the female can extend to 25 mm. The undersides of the adults are generally shades of mottled yellow/olive and black.


Skwala americana (male and female in copula)
 
Skwala americana (adult male with reduced wings)
 
But at this stage of the game fishing a nymph is the way to go (dry fly action will not pick up until there are enough females returning to the water to lay eggs). Most of the action will take place late in the afternoon and into the evening. Look for current seams in areas with moderate to fast current and lots of fist size or larger rocks.

Monday, April 29, 2013

A Little More Progress

I was hoping to get out this weekend so I could provide a solid update on central Alberta trout streams but there was just too much happening on the home-front. Creeks closer to home were running high and muddy, and I am guessing things were about the same out west. Hopefully next weekend will work out.

I did however get a chance to do some sanding on the wood fly rod blank. It is coming along nicely - the tip section just needs a little more work and then it will be ready to laminate.

Monday, April 15, 2013

Part 5: Sanding to Taper


Aside from a few angling excursions over the past few weeks, I have also spent some time working on the wood fly rod build. The project continued with part 5 which involves sanding the rod blank down to the desired taper. This is one of the more intricate and lengthy stages of the process that is best accomplished by working on it a little at a time – sanding for a half hour or so whenever time allows. The goal at this stage is to bring the rod blank to a point where the rod has the general flex and action characteristics that you are looking for.  Part 6, the pseudo-lamination process, will stiffen it up just a little, but some final sanding in part 7 will bring it back to where you want it.

I do not use any measuring tools for this stage – I do everything by feel. Experience has taught me what to look for when it comes to rod action and flex characteristics, and I just go with my instincts. I am not even sure that precise measurements would enable anyone to reproduce specific rod actions with any degree of accuracy; unlike bamboo, there is just too much variation in the wood characteristics to allow for accurate reproduction using measurements. If you are just starting out, and need some sort of guidance, I would recommend having a fly rod of the action you are trying to produce close at hand, and use it to compare flex characteristics and action as you sand the wood blank to taper.

The sanding process is similar to the Initial Sanding; a piece of sandpaper is folded around the blank and worked back and forth as the blank is rotated. But unlike the initial sanding, where the goal was to simply produce an even taper, here you want to pay more attention to how the blank actually flexes. As you sand, you need to be constantly testing the blank by pressing the tip down on the ground and seeing/feeling how it flexes. A few casting strokes will also give you a good idea of the rod action. Generally you will end up with a blank that is relatively thin at the tip, evenly tapered into the middle section, and a quick taper to a thicker butt section. A simple even taper all along the blank will not produce a rod with even action or proper flex characteristics – the blank needs to be heavier in the bottom half of the rod to have the backbone to make a cast.
 
It is best to use 100 or 120 grit sandpaper for this work. Coarser sandpaper will certainly speed up the job but you will be left with deep scratches that will weaken the blank. In addition, slowing the sanding process makes it less likely that you will over-sand a section, rendering the blank useless. As you sand pay attention to how the blank flexes, and simply sand more where you need more flex, and less where you need less flex.
Two key areas that will need a little extra attention are the tip and the butt. The tip needs to have a good even flex with a tip fine enough to accept a 6.5 or 6.0 tip guide (usually the largest sizes available). The butt section needs to be heavy enough to provide backbone to the rod but thin enough to fit into the wood insert of the reel seat (the bore of the cork grip can usually be filed out to match the rod dimensions). I like to have a few different sizes of tip guides, and the reel seat/grip assembly on hand to ensure everything will fit together.

One final thing to be aware of is that even though the drying process may have resulted in an almost perfectly straight blank, the sanding process often releases tension as wood fibers are sanded away, resulting in some slight warping of the blank. This warping is unavoidable – and becomes a part of the character of each individual rod.
 
Once the rod has been sanded to the desired taper, it’s on to the pseudo-lamination process.

Tuesday, April 2, 2013

What's Hatching on Stauffer Creek


This past long weekend was a great opportunity to get out and enjoy a day on the water. Temperatures were warm enough to stir things up but not so warm as to cause excessive run-off (at least not where I was). The trout were active, the bugs were active, and there was good fishing to be had. And yes, even the odd fish rising.

Winter stonefly hatches on Stauffer Creek are on again with both Utacapnia trava and Zapada cinctipes emerging in reasonable numbers. These are the first two stonefly species to emerge on most central Alberta trout streams and although they look very similar, and can be imitated with the same fly patterns, they are easy to tell apart if you look closely.

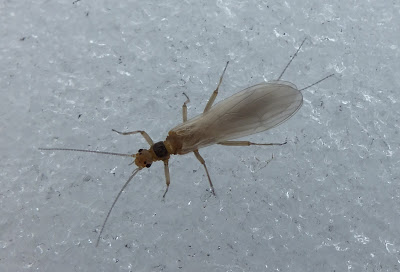
Utacapnia trava is in the family Capniidae and is characterized (in part) by longer tails with more than 4 segments. On the winged females the tails can be seen extending past the wing tips. The wings are rather plain looking and other than venation, they lack any distinctive pattern. The males will also have long tails but they have reduced wings and are often mistaken for nymphs crawling on the snow.


Utacapnia trava (adult female)
Utacapnia trava (adult male)

Zapada cinctipes, in the family Nemouridae, have short stubby tails that are hidden by the wings – both males and females have fully developed wings. The wings of both sexes exhibit some faint patterning. If you have a small hand lens you may also see branched gill remnants in the ventral neck region of both male and female adults.


Zapada cinctipes (adult male)

Another thing to watch for are adults that are light brown to tan in colour; these are teneral adults that have just emerged – they will darken as their exoskeleton hardens.

Utacapnia trava (teneral female)

Things will get more complicated in a few weeks as more winter stonefly species start to emerge, but for now this at-a-glance identification on Stauffer Creek is relatively reliable.

Temperatures look to be a little cooler for the coming weekend but this could be more of a blessing – with the heavy snow-pack, a slower melt should keep streams in fishable condition.